![OA_Logo-600x600-1.png]](https://www.omnially.com/hs-fs/hubfs/OA_Logo-600x600-1.png?height=40&name=OA_Logo-600x600-1.png)
Where to find it: Projects → select a project → Project Inventory
Project Inventory is a structured record of the physical hardware deployed at a site: displays, media players, touchscreens, kiosks, mounting hardware, and supporting accessories. It helps you track equipment across its whole lifecycle, from installation through maintenance to eventual replacement.
Keeping accurate inventory improves asset management, simplifies support, and keeps important equipment information in one accessible place.
Before You Begin
Before managing Project Inventory:
• Make sure you have permission to manage project assets.
• Verify you’re working within the correct Project.
• Gather the relevant hardware information: serial numbers, warranty details, and installation locations.
Accessing Project Inventory
To Open Project Inventory
1. Navigate to Projects.
2. Open the Project you want.
3. Select Project Inventory.
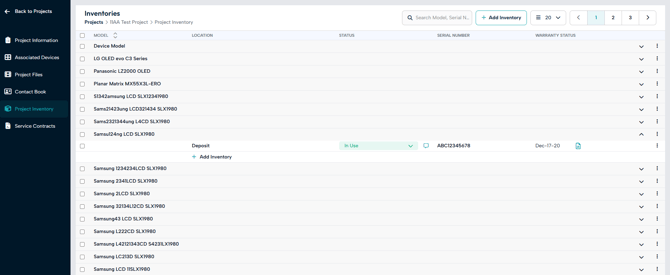
4. The page displays all hardware associated with the Project.
How Inventory Is Structured
Inventory is organised in two levels:
• Groups : each group represents one hardware model, for example “65-inch Samsung Display”.
• Items : each item is an individual unit of that model, with its own location, serial number, and status.
So a Project with eight identical lobby screens would have one group (the model) containing eight items (the units). Group names must be unique within the Project.
Note This is different from free-form categories like “Displays” or “Accessories”. A group is a specific model, and its items are the actual units of that model on site.
You can rename a group at any time, or delete one once it’s empty.
Inventory Items
Each item row shows where the unit is installed, its current status, its serial number, and its warranty status. Clicking an item’s location or serial number opens a side panel with its full details, where you can:
• Edit its information
• View its status history
• Attach or remove files
• Delete it (permanent, with confirmation)
Item Status
Status tells you the condition and availability of each unit:
|
Status: |
Meaning |
|
In Use: |
Actively deployed and operational (for example, a display showing donor recognition content). |
|
Being Repaired |
Out of service while being repaired. |
|
Spare: |
Available but not currently deployed (for example, a replacement player kept in storage). |
|
Decommissioned: |
Retired from active use (such as hardware replaced during an upgrade). |
Status History
Click an item’s status dot to see its full history: every previous status, with the date and any notes. This gives you a clear record of when a unit was installed, repaired, or retired, without keeping that information elsewhere.
Tip Update an item’s status whenever equipment is installed, removed, repaired, or retired. The history then becomes a reliable maintenance timeline.
Adding Inventory Items
To Add an Item
1. Open Project Inventory.
2. In the relevant group, select the Add Inventory row.
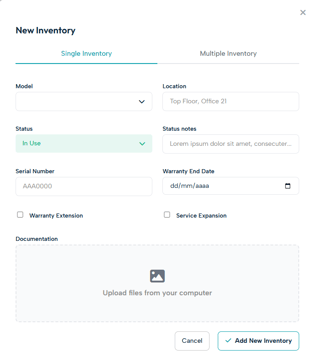
3. Enter the model (or create a new one), location, status, serial number, and warranty date.
4. Optionally add a warranty extension or service expansion, and attach any documents.
5. Save the record.
Documents and Notes
You can attach documents directly to an inventory item — product manuals, warranty certificates, installation photos, service records, and technical specifications. This ensures important information stays with the equipment throughout its life. Notes add useful context, such as installation observations, repair history, or special maintenance requirements (for example, “Installed in Main Lobby. Replacement power supply added June 2025.”).
Updating Several Items at Once
There are two ways to work with many items together.
Multi-Select Edits
Select multiple items with the checkboxes to update their location, warranty, or status together, or to delete them in one step. This is handy for routine changes across a batch of units.
Importing from a Spreadsheet
To load many items at once, import a spreadsheet. You match its columns to the expected fields, and the system checks every row before saving anything, reporting any problems by field and row number. You can attach files to apply to every item the import creates.
Important: The import is all-or-nothing (if any row fails validation, the whole import is cancelled and nothing is saved. Fix the reported rows and import again. You’ll never end up with a half-finished import.
Inventory Review Checklist
Periodically review your records and confirm:
• Asset information is accurate.
• Status is current.
• Warranty information is up to date.
• Documentation is attached.
• Installation locations are correct.
Best Practices
• Maintain accurate records. Update inventory whenever hardware changes.
• Record serial numbers. They simplify support, warranty claims, and asset tracking.
• Store supporting documentation. Attach manuals, warranties, and installation photos whenever possible.
• Review inventory regularly. Periodic reviews catch outdated information and missing assets.
• Track equipment through its lifecycle. Keep records (and status history) from installation through retirement.