The Canvas is the primary design workspace used to create and manage the content displayed on your screens. Think of a Canvas as a presentation made up of multiple pages. Each page contains content elements called widgets, such as images, text, playlists, donor lists, and popups.
Whether you’re creating a donor recognition display, a digital sign, or an interactive experience, the Canvas gives you the tools to build and organise your content.
Before You Begin
Before working with a Canvas, make sure:
• You have access to the Canvas editor.
• Any images, videos, or other media you plan to use have been uploaded.
• Any playlists or donor data sources have already been configured.
• You have permission to publish content to devices.
Understanding the Canvas Workspace
How to Access the Canvas Editor
1. Open the platform.
2. Navigate to the Canvas section.
3. Select an existing Canvas, or create a new one.
4. The Canvas editor will open.
Canvas Layout
The Canvas editor is divided into four main areas.
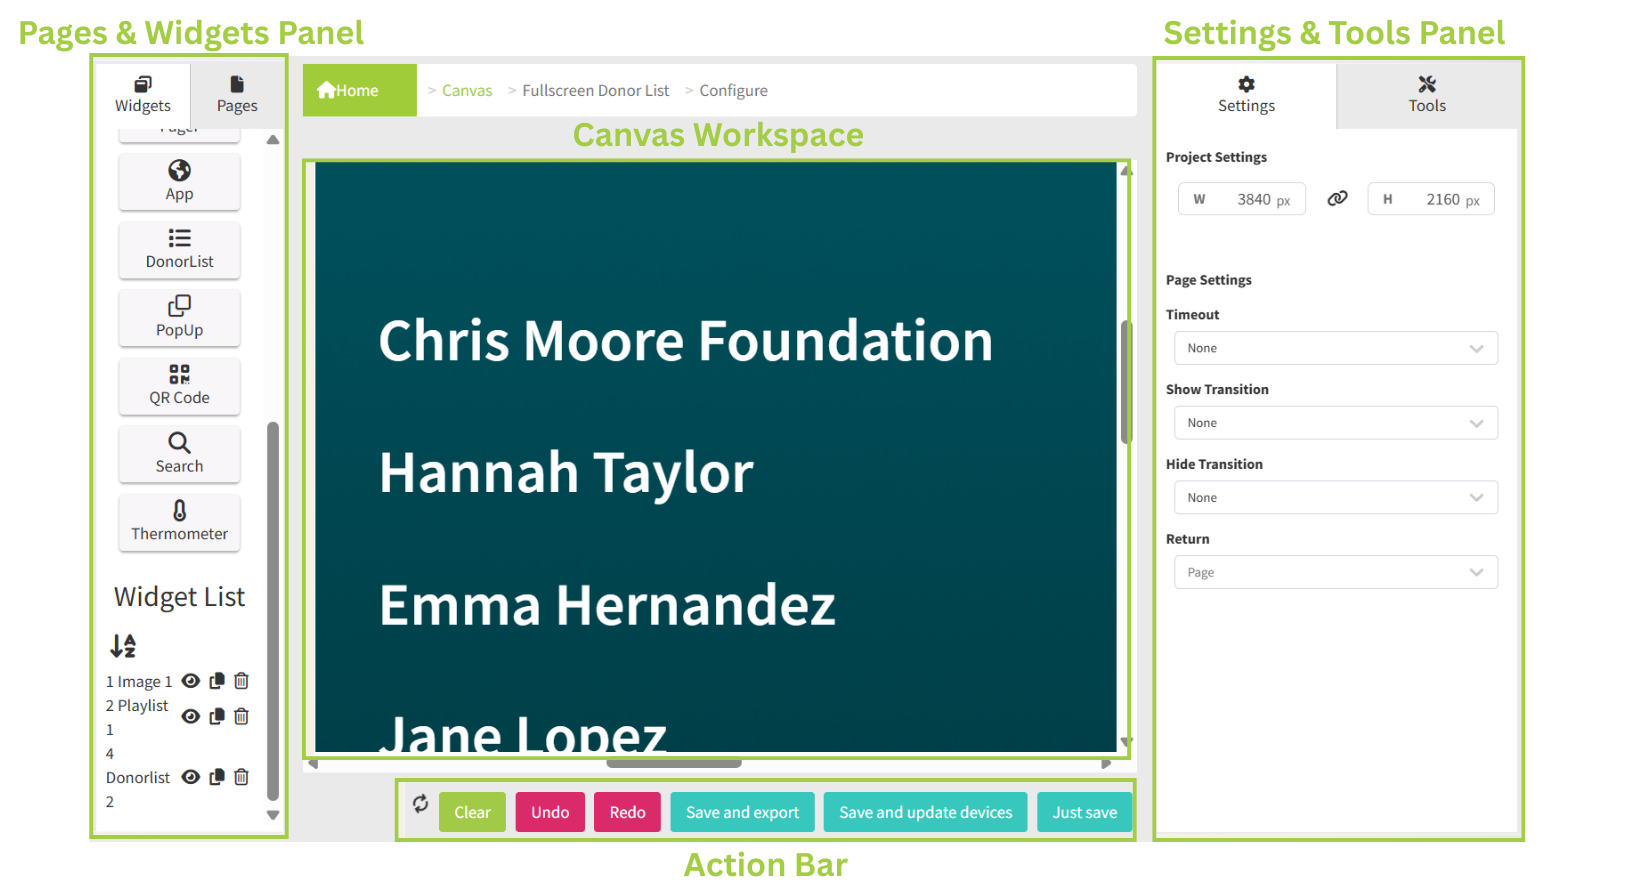
Pages & Widgets Panel (left side)
• Pages tab : manage the pages that make up your project.
• Widgets tab : add new content elements to a page.
• Widget list : view and manage all widgets on the currently selected page.
Canvas Workspace (centre)
This is your primary design area. Use it to position widgets, resize content, arrange layouts, and build page designs. The Canvas uses a fixed screen size, so what you design in the editor matches exactly what appears on the display.
Settings & Tools Panel (right side)
This area changes depending on what is selected. Use it to configure page and widget settings, adjust layer order, align content, and control zoom.
Action Bar (bottom)
Contains commonly used functions: Save, Save and Export, Save and Update Devices, Undo, Redo, and Clear.
Understanding Pages and Widgets
What Is a Page?
A page represents a single screen within your Canvas. A project can contain one page or many. For example, a donor recognition display might contain a Welcome page, a Donor Recognition page, a Sponsor page, and a Thank You page; each created as a separate page.
What Is a Widget?
Widgets are the content elements placed on a page. They can be resized, positioned, layered, and customised.
|
Widget type |
Purpose |
|
Image |
Display logos, photos, and graphics. |
|
Text |
Display messages and announcements. |
|
Playlist |
Display videos and image collections. |
|
Donor List |
Display donor recognition information. |
|
Popup |
Display additional information when triggered. |
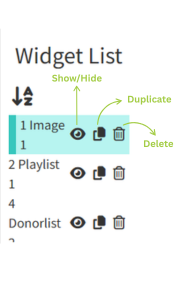
Using the Widget List
The widget list displays every widget on the selected page. It makes managing complex layouts easier, especially where widgets overlap or are hard to select directly on the Canvas.
Selecting a Widget
1. Open the widget list.
2. Click the widget name.
3. The widget’s settings appear in the Settings panel.
Showing or Hiding Widgets
1. Locate the widget in the widget list.
2. Click the visibility icon to hide it. Hidden widgets don’t appear on the Canvas or on the display.
3. Click the visibility icon again to show it.
Duplicating a Widget
1. Locate the widget in the widget list.
2. Select the duplicate option.
3. A copy is created on the page, positioned slightly offset from the original so you can see both.
Tip Useful when building several similar content elements. If you don’t see the new copy at first, look just below and to the right of the original. It’s offset by a small amount, not placed directly on top.
Deleting a Widget
1. Select the widget.
2. Choose Delete.
3. The widget is permanently removed from the page.
Working with Layers
When widgets overlap, layers determine which one appears on top. For example, if a logo is hidden behind a background image, you can move the logo to a higher layer so it becomes visible.
Moving a Widget to the Front
1. Select the widget.
2. Open the Tools panel.
3. Choose Move to Front. The widget appears above all others.
Moving a Widget to the Back
1. Select the widget.
2. Open the Tools panel.
3. Choose Move to Back. The widget appears behind other content.
Moving a Widget One Layer at a Time
Use Increase Layer and Decrease Layer for smaller adjustments to the stacking order.
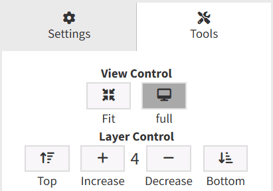
Aligning Content
Alignment tools help create clean, professional layouts.
Aligning a Single Widget
1. Select a widget.
2. Open the Tools panel.
3. Choose an alignment option (horizontal (left, centre, right) or vertical (top, middle, bottom)).
Aligning Multiple Widgets
1. Select multiple widgets.
2. Choose an alignment option.
3. The selected widgets align relative to the first widget you selected.

Saving Your Work
The Canvas offers several save options depending on your workflow.

|
Option |
What it does |
Use when |
|
Just Save |
Saves your changes without updating any devices. |
Content is still being edited, or changes need approval before publishing. |
|
Save and Export |
Saves the Canvas and generates an export package. |
Content needs to be distributed manually, or you want to keep a copy of the current version. |
|
Save and Update Devices |
Saves your changes and immediately updates any devices using the Canvas. |
Content is complete and you’re ready to publish. |
Important Whichever option you choose, the Canvas is checked for problems first (see Validation and Error Checking below). If an issue is found, saving is paused until you fix it.
Undo, Redo, and Clear
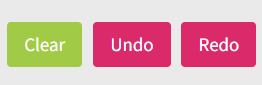
Undo reverses your recent actions — handy for quickly correcting a mistake.
Redo restores actions you’ve undone. Undo and Redo step through your last 20 actions.
Clear removes all widgets from the current project.
Important Clearing removes all content from the Canvas and can’t be undone beyond the usual action history. Use this option carefully.
Validation and Error Checking
Before content is saved, the platform checks the Canvas for configuration issues. If a problem is detected:
• The affected item is highlighted.
• Saving is temporarily prevented.
• The issue must be corrected before you can continue.
This helps ensure that incomplete or invalid content is never published to devices.
Best Practices
• Use descriptive names. Give pages and widgets meaningful names to make projects easier to manage.
• Save frequently. Regularly save your work while editing.
• Keep layouts organised. Use alignment tools and consistent spacing for a professional look.
• Review before publishing. Always preview content before updating devices.
• Use layers carefully. When widgets overlap, confirm that important content stays visible.